

Engine: 4G63T (DSM 1G / 2G)
Part of the Mitsubishi 4G63 family.
Modeled power and torque
Modelled estimate, not a dyno result.
Modeled estimate, not a dyno measurement. Real results vary with fuel, weather, dyno type and build.
Stock is anchored to the factory rating (195 hp at 6000 rpm, 203 lb-ft at 3000 rpm); the curve shape between peaks is modeled. Bolt-ons + tune (pump fuel, more boost): Stock turbo/supercharger; gains limited by compressor and fuel system.
4G63T (DSM 1G / 2G) data
- Load sensing
- MAF (Karman vortex)
- O2 sensor
- narrowband (zirconia)
- Closed loop
- Not yet sourced
- Block
- cast iron
- Rods / pistons
- 1990-92 6-bolt rods thicker than later 7-bolt rods (Wikipedia)
- Reported limit
- Not yet sourced
- Factory
- Top-feed, low-impedance with series resistor pack
- Impedance
- low (peak and hold)
- Direct-fit upgrades
- 6 maker-listed
- Knock
- MD141510 (1G DSM, forum)
- MAP / MAF
- Karman vortex, frequency (integrated IAT and baro)
- O2 (upstream)
- narrowband zirconia
Platform background
The second-generation DSM turbo cars (Eclipse GS-T/GSX, Talon TSi/TSi AWD) use an 8.5:1 7-bolt 4G63T rated 210 hp. They have a crank-snout trigger plus a separate cam sensor, non-adjustable timing, 450 cc low-impedance injectors and a smaller throttle body than the 1G. The 1998-99 cars reportedly got split thrust bearings and an Evo-type ECU. OEM documentation was not available in an acceptable form, so most rows here are low confidence.
Factory ECU
- Crank sensor at a trigger plate on the crank sprocket plus a cam sensor
- Timing not adjustable
Because the 2G crank sensor reads at the crank snout, axial crank movement (crankwalk) can damage the trigger and cause running faults. Treat crank sensor DTCs on a 7-bolt 2G as a reason to check crank end play.
Factory ECU: harness cross-reference
From the factory ECU each listed harness plugs into. The factory ECU is unplugged, not modified. Check the label and part number on your own ECU before ordering.
- ECU family
- Mitsubishi MD-series ECU, E2T case codes (e.g. E2T67380)
- Applies to
- Evo IV-VIII 5-speed all regions; Evo VIII MR USDM; Eclipse/Talon 2G turbo USDM; manual
- Not for
- not 6-speed JDM Evo VIII MR or Evo IX (use HT-186360); not automatic
- Supplier
- Mitsubishi Electric
Examples only: MD334794 (case E2T67380) listed as Evo IV; MD356472 as Evo IV-VI GSR. Evo VII/VIII and 2G Eclipse numbers not confirmed. Harness spans several ECU generations.
- ECU family
- Mitsubishi 2G DSM 4G63T ECU
- Applies to
- 1995-1999 Eclipse GS-T/GSX (and Eagle Talon TSi), manual
- Not for
- 420A non-turbo; automatic
Forum/resale only: MD312464 listed under early 2G turbo FWD (1/94-7/94 production); MD309947 resale listing for 1995 4G63T. 95-96 vs 97-99 ECUs reported to differ.
Factory ECU pinout
Each connector face drawn from the OEM service manual's pin data, with every terminal's function and wire colour where the manual prints it.
Mitsubishi Eclipse / Eagle Talon 2G 4G63T engine control module (ECM)
The 2G DSM turbo ECM is the engine computer of the 1995-99 Eclipse GST/GSX and Talon TSi with the 4G63T. The 1997 service manual shows four ECM connectors, B-53 to B-56, with 76 cavities numbered 1-26, 31-46, 51-62 and 71-92. This page transcribes the 1997 turbo terminal chart and circuit diagrams; 1995-96 cars are not yet checked.
1995-1999 (transcribed from the 1997 manual) · US / Canada · 4 connectors, 76 cavities · 76 terminals sourced
Looking into the ECU's connector. The harness plug seen from its wire side has the same layout.
How the OEM figure is oriented
ECM (device) side, looking into the ECM header face, lock ramp at the top. The 1997 EWD 'How to Read Circuit Diagrams' says connector symbols are drawn as viewed from the illustrated direction and that, for a connection to a device, the device-side connector symbol is shown; B-53 to B-56 are drawn with double outlines (male terminals), i.e. the ECM header.| Pin | Function | Type | Wire | Notes |
|---|---|---|---|---|
| 1 | No. 1 injector | low-side injector driver | G | Injector feed is from the MFI relay through resistor A-80. |
| 2 | No. 3 injector | low-side injector driver | 0.85G-Y | |
| 3 | Fuel pressure solenoid | low-side solenoid driver | L-R | |
| 4 | Idle air control stepper motor coil A1 | stepper coil driver | GR | |
| 5 | Idle air control stepper motor coil B1 | stepper coil driver | GR-L | |
| 6 | EGR solenoid | low-side solenoid driver | LG-R | Turbo terminal number taken from the circuit diagram; the turbo column of the check chart is partly cut off in the scan at this row. (medium confidence) |
| 7 | Engine/transaxle general control torque reduction request signal 1 | 5 V / 0 V logic to A/T control module | (B-L) | A/T link to the ELC 4-speed transaxle control module. Colour in parentheses = 0.3 mm2 wire. |
| 8 | Fuel pump relay | low-side relay driver | W-R | Printed as "WR" on the scanned page. |
| 9 | Evaporative emission purge solenoid | low-side solenoid driver | LG-B | |
| 10 | Ignition power transistor <A> | igniter trigger output | B-L | |
| 11 | Turbocharger waste gate solenoid | low-side solenoid driver | R-Y | |
| 12 | Power supply (from MFI relay) | 12 V switched input | 1.25R | |
| 13 | ECM ground | ground | (F)2B | Drawn as GND inside the ECM on the circuit diagram. |
| 14 | No. 2 injector | low-side injector driver | 0.85Y-B | |
| 15 | No. 4 injector | low-side injector driver | 0.85G-R | |
| 16 | Boost meter | gauge driver | R-B | Drives the boost gauge in the combination meter. |
| 17 | Idle air control stepper motor coil A2 | stepper coil driver | G-B | |
| 18 | Idle air control stepper motor coil B2 | stepper coil driver | G-Y | |
| 19 | Volume air flow sensor reset signal | reset output to VAF sensor | R-W | |
| 20 | Fan motor relay (High) | low-side relay driver | G-O | |
| 21 | Fan motor relay (Low) | low-side relay driver | G-B | |
| 22 | A/C compressor clutch relay | low-side relay driver | G | |
| 23 | Ignition power transistor <B> | igniter trigger output | BR-R | |
| 24 | Not used on 2.0L turbo | Other / not used | — | No circuit on the 2.0L turbo ECM in the 1997 terminal check chart or MFI circuit diagram (empty cavity). (medium confidence) |
| 25 | Power supply (from MFI relay) | 12 V switched input | 1.25R | |
| 26 | ECM ground | ground | 1.25B |
Our drawing from published pin data; not an OEM drawing. Layout from the OEM face view (high confidence). Confirm against the factory manual for your exact year and market before cutting or pinning wires.
Looking into the ECU's connector. The harness plug seen from its wire side has the same layout.
How the OEM figure is oriented
ECM (device) side, looking into the ECM header face, lock ramp at the top. The 1997 EWD 'How to Read Circuit Diagrams' says connector symbols are drawn as viewed from the illustrated direction and that, for a connection to a device, the device-side connector symbol is shown; B-53 to B-56 are drawn with double outlines (male terminals), i.e. the ECM header.| Pin | Function | Type | Wire | Notes |
|---|---|---|---|---|
| 31 | Not used on 2.0L turbo | Other / not used | — | No circuit on the 2.0L turbo ECM in the 1997 terminal check chart or MFI circuit diagram (empty cavity). (medium confidence) |
| 32 | Not used on 2.0L turbo | Other / not used | — | No circuit on the 2.0L turbo ECM in the 1997 terminal check chart or MFI circuit diagram (empty cavity). (medium confidence) |
| 33 | Generator G terminal | generator load input | W | |
| 34 | Not used on 2.0L turbo | Other / not used | — | No circuit on the 2.0L turbo ECM in the 1997 terminal check chart or MFI circuit diagram (empty cavity). (medium confidence) |
| 35 | Not used on 2.0L turbo | Other / not used | — | No circuit on the 2.0L turbo ECM in the 1997 terminal check chart or MFI circuit diagram (empty cavity). (medium confidence) |
| 36 | Check engine / malfunction indicator lamp | low-side lamp driver | G-R | |
| 37 | Power steering pressure switch | switch input (B+ / 0 V) | L-W | |
| 38 | MFI relay (power supply) control | low-side relay driver | L-G | |
| 39 | Not used on 2.0L turbo | Other / not used | — | No circuit on the 2.0L turbo ECM in the 1997 terminal check chart or MFI circuit diagram (empty cavity). (medium confidence) |
| 40 | Not used on 2.0L turbo | Other / not used | — | No circuit on the 2.0L turbo ECM in the 1997 terminal check chart or MFI circuit diagram (empty cavity). (medium confidence) |
| 41 | Generator FR terminal | generator field monitor input | G | |
| 42 | A/C refrigerant intermediate pressure switch | switch input | — | Listed for the 2.0L turbo in the terminal check chart; not drawn on the MFI circuit diagram pages used, so no wire colour. (medium confidence) |
| 43 | Engine/transaxle general control torque reduction request signal 2 | logic link to A/T control module | (W-G) | |
| 44 | Not used on 2.0L turbo | Other / not used | — | No circuit on the 2.0L turbo ECM in the 1997 terminal check chart or MFI circuit diagram (empty cavity). (medium confidence) |
| 45 | A/C switch | switch input | G-R | |
| 46 | Engine/transaxle general control torque execution signal | logic link from A/T control module | (O-B) | Check chart lists terminal 46; the circuit diagram label for this wire is partly clipped (reads "16") and runs to A/T control module terminal 18. (medium confidence) |
Our drawing from published pin data; not an OEM drawing. Layout from the OEM face view (high confidence). Confirm against the factory manual for your exact year and market before cutting or pinning wires.
Looking into the ECU's connector. The harness plug seen from its wire side has the same layout.
How the OEM figure is oriented
ECM (device) side, looking into the ECM header face, lock ramp at the top. The 1997 EWD 'How to Read Circuit Diagrams' says connector symbols are drawn as viewed from the illustrated direction and that, for a connection to a device, the device-side connector symbol is shown; B-53 to B-56 are drawn with double outlines (male terminals), i.e. the ECM header.| Pin | Function | Type | Wire | Notes |
|---|---|---|---|---|
| 51 | Not used on 2.0L turbo | Other / not used | — | No circuit on the 2.0L turbo ECM in the 1997 terminal check chart or MFI circuit diagram (empty cavity). (medium confidence) |
| 52 | Not used on 2.0L turbo | Other / not used | — | No circuit on the 2.0L turbo ECM in the 1997 terminal check chart or MFI circuit diagram (empty cavity). (medium confidence) |
| 53 | Not used on 2.0L turbo | Other / not used | — | No circuit on the 2.0L turbo ECM in the 1997 terminal check chart or MFI circuit diagram (empty cavity). (medium confidence) |
| 54 | Heated oxygen sensor heater (rear) | low-side heater driver | Y-B | OBD-II rear (downstream) sensor heater. |
| 55 | Not used on 2.0L turbo | Other / not used | — | 2.4L engine: evaporative emission ventilation solenoid. No circuit on the 2.0L turbo ECM in the 1997 terminal check chart or MFI circuit diagram (empty cavity). (medium confidence) |
| 56 | Diagnosis output to data link connector terminal 1 | diagnostic line | Y | (medium confidence) |
| 57 | Not used on 2.0L turbo | Other / not used | — | No circuit on the 2.0L turbo ECM in the 1997 terminal check chart or MFI circuit diagram (empty cavity). (medium confidence) |
| 58 | Engine ignition signal | tach / ignition pulse input from power transistor | W | Shared with the combination meter tachometer and A/T control module. |
| 59 | Not used on 2.0L turbo | Other / not used | — | No circuit on the 2.0L turbo ECM in the 1997 terminal check chart or MFI circuit diagram (empty cavity). (medium confidence) |
| 60 | Heated oxygen sensor heater (front) | low-side heater driver | Y | |
| 61 | Not used on 2.0L turbo | Other / not used | — | 2.4L engine: fuel tank differential pressure sensor. No circuit on the 2.0L turbo ECM in the 1997 terminal check chart or MFI circuit diagram (empty cavity). (medium confidence) |
| 62 | Serial data to data link connector terminal 7 | diagnostic serial line | P | (medium confidence) |
Our drawing from published pin data; not an OEM drawing. Layout from the OEM face view (high confidence). Confirm against the factory manual for your exact year and market before cutting or pinning wires.
Looking into the ECU's connector. The harness plug seen from its wire side has the same layout.
How the OEM figure is oriented
ECM (device) side, looking into the ECM header face, lock ramp at the top. The 1997 EWD 'How to Read Circuit Diagrams' says connector symbols are drawn as viewed from the illustrated direction and that, for a connection to a device, the device-side connector symbol is shown; B-53 to B-56 are drawn with double outlines (male terminals), i.e. the ECM header.| Pin | Function | Type | Wire | Notes |
|---|---|---|---|---|
| 71 | Ignition switch-ST | 12 V input while cranking | 1.25B-Y | |
| 72 | Intake air temperature sensor | 0-5 V analog (thermistor) | R-L | Sensor is inside the volume air flow sensor. |
| 73 | Manifold differential pressure sensor | 0-5 V analog | LG-B | |
| 74 | Not used on 2.0L turbo | Other / not used | — | No circuit on the 2.0L turbo ECM in the 1997 terminal check chart or MFI circuit diagram (empty cavity). (medium confidence) |
| 75 | Heated oxygen sensor (rear) | 0-1 V narrowband | W | |
| 76 | Heated oxygen sensor (front) | 0-1 V narrowband | W | |
| 77 | Not used on 2.0L turbo | Other / not used | — | No circuit on the 2.0L turbo ECM in the 1997 terminal check chart or MFI circuit diagram (empty cavity). (medium confidence) |
| 78 | Knock sensor | piezo knock signal | W | Shielded lead on the circuit diagram. (medium confidence) |
| 79 | Not used on 2.0L turbo | Other / not used | — | No circuit on the 2.0L turbo ECM in the 1997 terminal check chart or MFI circuit diagram (empty cavity). (medium confidence) |
| 80 | Backup power supply | 12 V permanent | R-L | |
| 81 | Sensor impressed voltage (5 V supply) | 5 V reference out | G-Y | Feeds TPS, VAF sensor block and MDP sensor. |
| 82 | Ignition switch-IG | 12 V ignition input | B-W | Circuit diagram shows IG on 82; the terminal check chart prints "92" for this item. Wiring follows the circuit diagram. (medium confidence) |
| 83 | Engine coolant temperature sensor | 0-5 V analog (thermistor) | B-W | |
| 84 | Throttle position sensor | 0-5 V analog | BR-R | |
| 85 | Barometric pressure sensor | 0-5 V analog | O | Sensor is inside the volume air flow sensor. |
| 86 | Vehicle speed sensor | 0-5 V pulse | Y | |
| 87 | Closed throttle position switch | switch input | Y-R | |
| 88 | Camshaft position sensor | Hall-type pulse (5 V pull-up) | L-R | |
| 89 | Crankshaft position sensor | Hall-type pulse (5 V pull-up) | L-W | |
| 90 | Volume air flow sensor | frequency (Karman vortex) | — | Wire colour label is cut off in the scan (reads "L-"). (medium confidence) |
| 91 | Park/Neutral position switch <A/T> | switch input | 1.25B-R | M/T: the circuit diagram shows terminal 91 tied to ground with a 1.25B wire. (medium confidence) |
| 92 | Sensor ground | sensor return | B | Returns for ECT, MDP sensor and other sensors. (medium confidence) |
Our drawing from published pin data; not an OEM drawing. Layout from the OEM face view (high confidence). Confirm against the factory manual for your exact year and market before cutting or pinning wires.
Coverage, year splits and safety
Year coverage: transcribed from the 1997 Eclipse/Spyder manual (2.0L turbo column of the 13A terminal chart plus the 1997 MFI turbo circuit diagrams). 1995-96 (first 2G years, with the 1996 OBD-II change) and 1998-99 cars were not checked against their own manuals; confirm terminal use before wiring those years.
M/T vs A/T: terminals 7, 43 and 46 are the torque-reduction / execution links to the ELC 4-speed A/T control module, and 91 is the park/neutral input on A/T. On M/T the circuit diagram shows 91 tied to ground. EGR solenoid (6) appears only where an EGR valve is fitted.
Two known print issues: the check chart prints "92" for Ignition switch-IG while the circuit diagram wires IG (B-W) to 82 and sensor ground (B) to 92; terminal 46's diagram label is clipped. This page follows the circuit diagram for 82/92.
Wire colours are as printed in the circuit diagram (Mitsubishi code, e.g. 1.25B-L = 1.25 mm2 black with blue tracer; (F) = flexible wire; colours in parentheses = 0.3 mm2). Not covered: 2.0L non-turbo (420A) and 2.4L Spyder ECMs, which use different terminal assignments.
Safety: disconnect the battery before unplugging the ECM. The service manual has you back-probe from the wire side with a fine wire probe with the ECM connected; never force sharp probes into the terminals or short a probe to ground, which the manual warns can damage wiring, sensors or the ECM.
Plug-and-play harness
A plug-in harness built for the Haltech Nexus S3 pinout is listed for this vehicle. The ECU2 follows that published pinout, so the factory ECU is unplugged and the ECU2 plugs into the car's own loom. Nothing is written to the factory ECU. Pin-compatible per the published S3 pinout, not yet fit-tested.
| Maker | Harness | Fits | Link | |
|---|---|---|---|---|
 | Mitsubishi EVO 4-8 & 2GHT-186332 | Evo IV-VIII 5-speed all regions; Evo VIII MR USDM; Eclipse/Talon 2G turbo USDM; manual | $535Lowest | Maker ↗ |
 | Manual 1995 - 1999 Mitsubishi Eclipse TurboBF29157-S3 | 1995-1999 Eclipse GS-T/GSX (and Eagle Talon TSi), manual | $840 | Maker ↗ |
| Wire-in | Universal flying lead or re-terminated factory harness | Any engine (terminate to ECU2's two Superseal 34 connectors) | Universal harness from $405 | Maker ↗ |
Nexus S3 Plug n Play Adapter Harness Mitsubishi EVO 4-8 & 2G
- Plugs into
Mitsubishi 4G63T ECU (Evo IV-VIII / Eclipse 2G Turbo) · MD334794, MD356472
- OEM part numbers
- MD334794, MD356472
- ECU
- Mitsubishi Electric · Mitsubishi MD-series ECU, E2T case codes (e.g. E2T67380)
- Confidence
- low
Examples only: MD334794 (case E2T67380) listed as Evo IV; MD356472 as Evo IV-VI GSR. Evo VII/VIII and 2G Eclipse numbers not confirmed. Harness spans several ECU generations.
Sources: E-1443
- Fits
- Evo IV-VIII 5-speed all regions; Evo VIII MR USDM; Eclipse/Talon 2G turbo USDM; manual
- Exclusions
- not 6-speed JDM Evo VIII MR or Evo IX (use HT-186360); not automatic
- SKU
- HT-186332
- Maker fitment
- Mitsubishi EVO 4-8 (5-speed, all regions), EVO 8 MR (USDM), Eclipse 2G Turbo (USDM); manual only
- Maker notes
- kit HT-213308
Boomslang plug-and-play harness for Haltech Nexus S3 - Manual 1995 - 1999 Mitsubishi Eclipse Turbo
- Plugs into
2G DSM turbo ECU (4G63T, Eclipse/Talon 1995-99) · MD312464, MD309947
- OEM part numbers
- MD312464, MD309947
- ECU
- Mitsubishi 2G DSM 4G63T ECU
- Confidence
- low
Forum/resale only: MD312464 listed under early 2G turbo FWD (1/94-7/94 production); MD309947 resale listing for 1995 4G63T. 95-96 vs 97-99 ECUs reported to differ.
Sources: E-1483
- Fits
- 1995-1999 Eclipse GS-T/GSX (and Eagle Talon TSi), manual
- Exclusions
- 420A non-turbo; automatic
- SKU
- BF29157-S3
- Maker fitment
- Mitsubishi Eclipse Turbo (Manual); selector years 1995-1999; SKU label: Manual 1995 - 1999 Mitsubishi Eclipse Turbo
- Maker notes
- separate SKUs exist for other Nexus models (-S2/-R3/-R5/-T1/-T2); Eclipse Turbo; Talon not listed separately
Haltech and Boomslang are trademarks of their respective owners. GAINS is not affiliated with or endorsed by them.
Your GAINS system for this car · pre-release
ECU2 for the Eclipse / Talon (DSM) 2G
Planned with the same rules as the configurator for this car's 4 cyl · port injection · cable throttle. The factory ECU is unplugged and replaced; nothing is written to it.
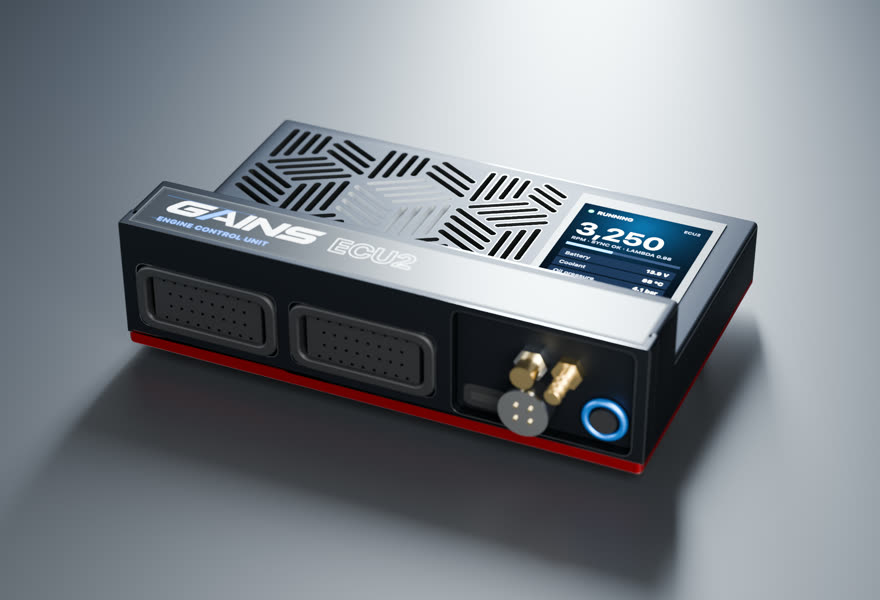
- Price TBA
ECU2Engine controller
4 cyl · port injection · cable throttle
Full sequential fuel and spark for this 4-cylinder on a cable throttle, with the wideband built in.
in designEst. availability: April 2027
Add PDM2 to switch and protect chassis loads (pumps, fans, lights, accessories). Add it in the configurator →
Track days? Add the Telemetry Dongle Pro for 25 Hz GPS lap timing; it plugs into the OBD-II port, and your phone is the dash. Plan it in the configurator →
What you get
- A screen on the ECUA 2.4-inch, 500-nit display in the lid, readable in a footwell.
- Faults in plain words"Coolant temp sensor open circuit.
- S3-style harnessesConnector A and C pin functions follow the published Nexus S3 wiring diagram.
- Powered CAN portA sealed 4-pin port on the insert carries 12 V and CAN for the PDM2 and GAINS displays: one cable per accessory.
- GAINS insideThe on-ECU adaptive layer, the app, logging and your limits.
How it wires in
- Haltech S3 plug-in harness1 listed · from $535 USD listHT-186332
- Factory-connector → S3 adapter1 listed · from $840 USD list
- Wire-inAlways possible
Pin-compatible per the published S3 pinout, not yet fit-tested. Every harness option for this car ↓
ECU2 is in design; specifications may change. All GAINS hardware is pre-release concept design; nothing is for sale yet and no application is validated on a vehicle. Harness fitment is from published pinouts and not yet fit-tested.
How GAINS approaches the Eclipse / Talon (DSM) 2G
Our starting method for this engine, as foundations first: get it running and drivable, then learn fuel, then the hardware-specific strategies. It is a methodology outline, not a validated calibration.
- 1Base map and first startplanned
Start from displacement, injector data and the sensors fitted, then let the first-start learner settle cranking, idle and warm-up before any load work. The goal is a safe, running engine, not a finished calibration.
- 2Lambda targets and VE learningclosed loop on GAINS ECUs
Air-fuel targets come from your goal (street, track, economy). The ECU then learns its fuel table cell by cell from the onboard wideband inside a signed envelope, and you approve promoting what it learned into the base map.
- 3Boost controlgated
A closed-loop boost target by gear and goal, held inside the authority envelope, with knock protection active at boost. Raising boost authority is never automatic; it stays an expert or dyno decision.
- 4Drivability foundationsplanned
Pedal map, tip-in and decel fuel, idle control, cold start and warm-up enrichment: the tables tuners spend hours on after the main map. Each is a strategy in the knowledge engine with its own limits.
- 5Factory load sensingfactory reference
What the factory ECU measures load with: MAF (Karman vortex) (medium confidence)
- 6Wideband sensorhardware
Add a wideband: the factory narrowband only tells rich from lean around stoichiometric, so it cannot close the loop at power or economy targets; fit a Bosch LSU 4.9 for the GAINS ECU's built-in controller
- 7Bottom end and head sealingfactory reference
Reported: 7-bolt engines commonly reported prone to crankwalk (thrust bearing), improved with 1997.5+ revised thrust (forum); rods/pistons cited before crank (forum). (low confidence) Limits depend on tune quality, fuel, rpm and condition and are not guaranteed.
Drivetrain
Chassis integration
Tuning notes
- Sources disagree on the 2G turbo designation
- Inspect the unit before ordering parts
Fixed crank and cam sensors mean base timing is set in the calibration, not mechanically. Swapping a 6-bolt engine into a 2G usually brings the 1G CAS along, because it supplies both signals.
Popular swaps
GAINS on the Eclipse / Talon (DSM) 2G
ECU2
Designed so your phone is the laptop, keypad and dash
The GAINS app is designed to handle tuning, logging, gauges and switch inputs over Bluetooth, so the system needs no separate CAN keypad or display. Keypad, dash and logging views are planned; the iOS prototype runs on simulated data today.
Wideband, IMU and logging built in
An onboard Bosch LSU 4.9 wideband controller, a 6-axis IMU and onboard logging are designed into the ECU rather than sold as add-on modules.
Modular, so you buy what the engine needs
This engine runs on ECU2. PDM2 (power, body and gearbox) is optional and connects over ECU2's powered CAN port; the Telemetry Dongle Pro adds GPS lap timing from the OBD-II port.
Calibration that keeps learning
Instead of a fixed map that drifts as parts and conditions change, the ECU keeps adapting its fuel trims within limits you can see and approve in the app.
Adaptive tuning strategies
- VE learning closed loop on GAINS ECUs
Learns the fuel table from the onboard wideband as you drive, cell by cell, inside a signed authority envelope. Learned trims are promoted into the base map without a step in fuelling.
- Goal-based lambda targets closed loop on GAINS ECUs
Sets air-fuel targets from your goal (economy, response, power, safety margin) instead of a single fixed table.
- Knock protection protection
Listens for knock on a dedicated knock processor, pulls timing at once and restores it slowly. It only ever reduces advance.
- Warm-up, cranking, idle and transient fuel planned
The same learning approach applied to the tables tuners spend hours on after the main map is done.
- Spark advance and boost authority gated
Widening ignition advance or boost is never automatic. It stays an expert or dyno decision until validated knock detection exists for the engine family.
Already running another ECU? In advisor mode the same strategies read your logs and recommend exact table changes with the reasoning, which you apply in your ECU vendor's own software.
GAINS hardware is pre-release concept design. Simulated results only; nothing is validated on a vehicle yet.
Frequently asked
Why do 2G DSMs get crankwalk?
Thrust bearing failure on 7-bolt engines is widely reported, but forum consensus on the root cause is split. The 1998-99 cars received split thrust bearings.45
Can you adjust timing on a 2G DSM?
Not mechanically. The 2G crank and cam sensors are fixed, so timing is set in the ECU calibration.2
What compression ratio is the 2G 4G63T?
8.5:1, up from 7.8:1 on the 1G.4
What size are 2G DSM injectors?
450 cc low impedance, run with a resistor pack.3
Sources
Numbered as cited above. Hover or tap a citation chip to preview it.
- A Karman Vortex Airflow Sensor (SAE 820322) · SAE International · sae-paper · retrieved 2026-10-25
- CAS and CKP sensors (forum thread) · DSMTuners · community · retrieved 2026-10-25
- Injector sizes (forum thread) · DSMTuners · community · retrieved 2026-10-25
- Mitsubishi Eclipse · Wikipedia · community · retrieved 2026-10-25
- Top Ten Engines - #3 Mitsubishi 4G63T · DSPORT Magazine · press · retrieved 2026-10-25
Catalog data and evidence
- Catalog data, not yet expert-reviewed.
- No vehicle photos: illustrations only until licensed imagery is available.
- E-901 Haltech S3 plug-in harness family (sourced, high confidence)
- E-912 Haltech S3 adapter harness page (sourced, high confidence)
- E-934 Boomslang identity (sourced, high confidence)
- E-935 Boomslang S3 catalog size (sourced, high confidence)
- E-900 Haltech Nexus S3 catalog (sourced, high confidence)
- E-941 S3 engine harness availability (inferred, medium confidence)
- E-1443 Evo IV-VI ECU (reported, low confidence)
- E-1483 harness ECU xref: Mitsubishi DSM 4G63T ECUs (unverified, low confidence)