

Engine: BP 1.8 / B6 1.6 (MX-5 NA / NB)
Part of the Mazda B6 / BP family.
Modeled power and torque
Modelled estimate, not a dyno result.
Modeled estimate, not a dyno measurement. Real results vary with fuel, weather, dyno type and build.
Stock is anchored to the factory rating (128 hp at 6500 rpm, 110 lb-ft at 5000 rpm); the curve shape between peaks is modeled. Intake + exhaust + tune (pump fuel): Typical NA gains come mostly above mid-rpm.
BP 1.8 / B6 1.6 (MX-5 NA / NB) data
- Load sensing
- mixed by year/market
- O2 sensor
- narrowband (zirconia)
- Closed loop
- Not yet sourced
- Block
- cast iron
- Rods / pistons
- BP-ZE has oil squirters (Wikipedia)
- Reported limit
- ~200-250 whp on stock rods (forum anecdotes); ~300 hp piston comfort zone (BOFI blog)
- Factory
- Top-feed
- Impedance
- high (saturated) (forum)
- Direct-fit upgrades
- 5 maker-listed
- Knock
- Not yet sourced
- MAP / MAF
- B6S7-13-210A (1990-93 1.6)|FS1E-13-215 (NB listing)
- O2 (upstream)
- narrowband zirconia
Factory ECU
From the factory ECU each listed harness plugs into. The factory ECU is unplugged, not modified. Check the label and part number on your own ECU before ordering.
- ECU family
- Mazda xxxx-18-881 engine control unit
- Applies to
- NA 1.6 (1990-93) and 1.8 (1994-97); manual
- Not for
- USDM OBD-II 1996-97; SE/Anniversary; automatic
Examples from used-parts listings.
- ECU family
- Mazda B6 (NA)
- Applies to
- 1990-93 Miata 1.6 manual
- Not for
- California-spec units may differ (B6AW seen)
Marketplace listings.
- ECU family
- Mazda BP (NA)
- Applies to
- 1994-95 Miata 1.8 manual
Family from maker fitment only.
- ECU family
- Mazda BP (NA)
- Applies to
- 1996-97 Miata 1.8 manual
Factory ECU pinout
Each connector face drawn from the OEM service manual's pin data, with every terminal's function and wire colour where the manual prints it.
Mazda MX-5 Miata NA 1.6 (B6) engine control unit, 1990-93 US / Canada
The 1990-93 Mazda MX-5 Miata 1.6 (B6) uses a Mazda E.G.I. engine control unit behind the passenger footwell with two harness connectors: connector 1 (22 cavities, 1A-1V) and connector 2 (26 cavities, 2A-2Z), 48 in all. It runs a vane airflow meter, Ne and G crank angle signals, paired injectors and two igniter channels. This page transcribes Mazda's terminal table, face layout and wire colours.
1990-93 1.6 (pinout from 1990 manual and a later NA 1.6 wiring diagram) · USA (Federal, California) and Canada · 2 connectors, 48 cavities · 48 terminals sourced · ECU B61P-18-881A, B64J-18-881
Looking into the harness plug's mating face (mirror of the ECU face).
How the OEM figure is oriented
Mazda prints this face twice: the workshop manual 'Terminal location' figure (F-130) and the wiring diagram connector view B1-01 (Z-30). Both show 1U ... 1A along the top row and 1V ... 1B along the bottom, left to right, with the stepped latch lug on the top edge. The F-130 figure does not say which side it shows; Mazda's wiring diagram rules (Z-GI-5) state that connector diagrams always show the harness-side connector, and the Z-30 view uses the same cavity order, so the face is stored as harness side. Confirm against the moulded letters before wiring.| Pin | Function | Type | Wire | Notes |
|---|---|---|---|---|
| 1A | Battery, constant supply for memory backup | 12 V constant | L/R | Fed from the ROOM 10A fuse (Mazda terminal-voltage table, Z-34). About 12 V at all times. |
| 1B | Main relay output (ECU switched supply) | 12 V switched | W/R | 0 V ignition OFF, about 12 V ignition ON. |
| 1C | Ignition switch START position (cranking signal) | 12 V input while cranking | V | About 10 V while cranking, 0 V with the key in ON. |
| 1D | Self-Diagnosis Checker monitor lamp (diagnosis connector MEN) | diagnostic output, low-side | W/G | Drives the monitor lamp of the Mazda Self-Diagnosis Checker via diagnosis connector terminal MEN (Z-34); about 5 V lit, 12 V off with the checker connected. |
| 1E | Malfunction indicator lamp (MIL) | lamp driver, low-side | Y/B | Below 2.5 V lamp on, about 12 V lamp off. |
| 1F | Self-Diagnosis Checker code output (diagnosis connector FEN) | diagnostic code output, low-side | W/Y | Pulses the checker buzzer to flash malfunction codes. The Z-34 table names the diagnosis connector terminal FEN. |
| 1G | Igniter drive output (one of two) | igniter trigger output | BR/Y | About 0 V key ON, about 0.2 V at idle. The B6 uses two igniter channels; the Mazda tables do not say which coil pair each terminal fires. |
| 1H | Igniter drive output (one of two) | igniter trigger output | BR | About 0 V key ON, about 0.2 V at idle. The Mazda F-81 code 01 circuit diagram labels the BR igniter wire as ECU terminal 1T, but the F-128 terminal table and the wiring diagram connector view both put the igniter on 1H and show 1T unused; 1H is taken as correct. |
| 1I | Not used (Mazda prints — in the terminal table) | Other / not used | — | Shown unused (*) in the Mazda wiring diagram connector view as well. |
| 1J | A/C relay | relay driver, low-side | L/B | About 12 V off, below 2.5 V with A/C on at idle. |
| 1K | Diagnosis connector test terminal (TEN) | 12 V input, grounded for self-test | LG/Y | Grounding TEN (System Selector at SELF-TEST) pulls this terminal to 0 V; about 12 V otherwise. TEN name from the Z-34 terminal-voltage table. |
| 1L | Not used (Mazda prints — in the terminal table) | Other / not used | — | Shown unused (*) in the Mazda wiring diagram connector view as well. |
| 1M | Not used (Mazda prints — in the terminal table) | Other / not used | — | Shown unused (*) in the Mazda wiring diagram connector view as well. |
| 1N | Throttle sensor idle contact (idle switch) | switch input | R | About 0 V pedal released, about 12 V pedal depressed (ignition ON). On/off throttle switch, not an analogue TPS, on the M/T car. |
| 1O | Stoplight (brake) switch | 12 V switch input | G | 0 V brake released, about 12 V brake pressed. |
| 1P | Power steering pressure switch | switch input (grounded when on) | L/Y | 0 V with P/S load at idle, about 12 V otherwise. Wire shown only on cars with power steering (Mazda prints <L/Y>); unused (*) without power steering. |
| 1Q | A/C switch | switch input (low = on) | LG/B | Below 2.5 V with A/C on (blower on), about 12 V off. |
| 1R | Fan switch (coolant) | switch input (low = fan on) | B/G | About 0 V with the fan operating (coolant over 97 C or TFA grounded), about 12 V when not. |
| 1S | Blower control switch | switch input (low = mid / high) | L/O | About 0 V at mid, high or super high, about 12 V off or low (ignition ON). |
| 1T | Not used (Mazda prints — in the terminal table) | Other / not used | — | Unused (*) in the wiring diagram connector view. The F-81 circuit diagram (code 01) labels an igniter wire as 1T; that conflicts with both the terminal table and the connector view and is treated as a misprint for 1H. Check for a wire in this cavity before reusing it. (medium confidence) |
| 1U | Headlight switch (electrical load signal) | 12 V switch input | R/B | About 12 V with tail, parking or headlights on, 0 V off. Fed from the TNS relay circuit (wiring diagram B-1b). |
| 1V | Neutral / clutch switch (M/T); inhibitor switch (A/T) | switch input (low = neutral / clutch down) | BR/W | M/T: about 0 V in neutral or with the clutch pedal down, about 12 V otherwise. The wiring diagram prints BR/W, and B/L on A/T cars (A/T inhibitor switch, 0 V in N or P). The 1990 workshop-manual table lists the M/T switch only. |
Our drawing from published pin data; not an OEM drawing. Layout from the OEM face view (medium confidence). Confirm against the factory manual for your exact year and market before cutting or pinning wires.
Looking into the harness plug's mating face (mirror of the ECU face).
How the OEM figure is oriented
Mazda prints this face twice: the workshop manual 'Terminal location' figure (F-130) and the wiring diagram connector view B1-01 (Z-30). Both show 1U ... 1A along the top row and 1V ... 1B along the bottom, left to right, with the stepped latch lug on the top edge. The F-130 figure does not say which side it shows; Mazda's wiring diagram rules (Z-GI-5) state that connector diagrams always show the harness-side connector, and the Z-30 view uses the same cavity order, so the face is stored as harness side. Confirm against the moulded letters before wiring.| Pin | Function | Type | Wire | Notes |
|---|---|---|---|---|
| 2A | Ground (injector) | power ground | B | Constant 0 V. Wiring diagram: B wire to harness ground point 1. |
| 2B | Ground (output) | power ground | B | Constant 0 V. |
| 2C | Ground (CPU) | logic ground | B/LG | Constant 0 V. Wiring diagram: B/LG to harness ground point 2. |
| 2D | Ground (input): sensor ground return | sensor ground | B/LG | Constant 0 V. The workshop manual's continuity checks return the airflow meter (terminal C), water thermosensor (B) and intake air thermosensor (C) to 2D, so this is the sensor ground. |
| 2E | Crank angle sensor Ne signal | 0/5 V square pulse (ECU pull-up, sensor switches to ground) | W | 0 V or 5 V with ignition ON, about 2 V average at idle. The F-82 check: about 5 V at 2E with the sensor unplugged; sensor C (W) to ECU 2E. |
| 2F | Not used (Mazda prints — in the terminal table) | Other / not used | — | Shown unused (*) in the Mazda wiring diagram connector view as well. |
| 2G | Crank angle sensor G signal | 0/5 V square pulse (ECU pull-up, sensor switches to ground) | Y/L | 0 V or 5 V with ignition ON, about 1.5 V average at idle. Sensor D (Y/L) to ECU 2G. |
| 2H | Emission specification select (California / Federal and Canada) | ground-select input | R/W | 1990 table: grounded on California spec (0 V), open on Federal and Canada spec (about 2 V). The later wiring diagram shows the R/W wire running to a short connector on Federal and California cars and the cavity unused (*) on Canadian cars, so the grounding rule may differ by model year. Check the car before reusing this pin. |
| 2I | Igniter IGf (ignition confirmation) input | igniter feedback input | B/W | Below 0.5 V ignition ON, about 1 V at idle. Code 01 (IGf signal) checks the igniter-to-ECU 2I wire. |
| 2J | Ground input (1990 table) | input tied to ground | — | 1990 workshop manual table: input, 'Ground', constant 0 V, no further description. The later wiring diagram shows 2J unused (*). Purpose not stated by Mazda. (medium confidence) |
| 2K | Airflow meter reference supply (Vref) | 5 V reference | LG/R | Constant 4.5-5.5 V. Feeds airflow meter terminal D; on A/T cars the analogue throttle sensor is also supplied from 2K (Z-34). |
| 2L | Throttle sensor power (full-load) contact (M/T) | switch input | LG/W | About 5 V pedal released, about 0 V fully depressed. Unused (*) on A/T cars per the wiring diagram, which use 2M instead. |
| 2M | Throttle sensor analogue output (A/T only) | 0-5 V analog | R/B | Not used on the 1990 M/T table. A/T cars: about 0.5 V released to about 4.0 V fully open (Mitchell 1991 reproduction of the Mazda chart; Z-34). Wire R/B shown on A/T only. (medium confidence) |
| 2N | Oxygen sensor signal | 0-1 V narrowband | R/L | 0-1 V after warm-up, 0 V cold. Shielded lead (GY drain to ground). The 1990 F-86 circuit diagram labels the sensor lead B; the wiring diagram prints R/L at the ECU and at the sensor connector. |
| 2O | Airflow meter signal (Vs) | 0-5 V analog | R | About 3.8 V ignition ON, about 3.3 V at idle (vane meter). Wire colour differs by document: the wiring diagram prints R at the ECU and airflow meter terminal F, while the 1990 workshop manual F-84 continuity table prints F (G/Y). Identify the wire by the airflow meter terminal, not colour. (medium confidence) |
| 2P | Intake air thermosensor (in airflow meter) | 0-5 V analog (NTC) | R/G | About 2.5 V at 20 C. Airflow meter terminal G (R/G). |
| 2Q | Water thermosensor (coolant temperature) | 0-5 V analog (NTC) | L/W | About 2.5 V at 20 C, about 0.4 V warm. Sensor terminal A (L/W). |
| 2R | Not used (Mazda prints — in the terminal table) | Other / not used | — | Shown unused (*) in the Mazda wiring diagram connector view as well. |
| 2S | Not used (Mazda prints — in the terminal table) | Other / not used | — | Shown unused (*) in the Mazda wiring diagram connector view as well. |
| 2T | Not used (Mazda prints — in the terminal table) | Other / not used | — | Shown unused (*) in the Mazda wiring diagram connector view as well. |
| 2U | Injectors No.1 and No.3 | low-side injector driver (paired) | Y | About 12 V ignition ON; pulses at idle (Engine Signal Monitor lights flash). Injectors are fired in pairs. |
| 2V | Injectors No.2 and No.4 | low-side injector driver (paired) | Y/B | As 2U. |
| 2W | ISC valve (idle speed control) | duty-cycle solenoid driver, low-side | L/O | About 7 V ignition ON, about 9 V at idle (averaged duty). ISC valve B (L/O) to ECU 2W; valve fed W/R from the main relay. |
| 2X | Solenoid valve (purge control) | solenoid driver, low-side | Y/R | About 12 V ignition ON and at idle. Valve B (Y/R) to ECU 2X; valve fed W/R from the main relay. |
| 2Y | Not used (Mazda prints — in the terminal table) | Other / not used | — | Shown unused (*) in the Mazda wiring diagram connector view as well. |
| 2Z | 4A/T control unit (A/T only) | output to A/T control unit | LG | Not used on the 1990 M/T table. A/T cars: output to the 4A/T control unit, about 0 V ignition ON (Mitchell 1991 reproduction of the Mazda chart); wire LG on A/T only per the wiring diagram. (medium confidence) |
Our drawing from published pin data; not an OEM drawing. Layout from the OEM face view (medium confidence). Confirm against the factory manual for your exact year and market before cutting or pinning wires.
Coverage, year splits and safety
Year split for the catalog row: the MX-5 NA catalog row (B6 / BP, 1989-97) spans three ECU generations. This file covers the 1.6 B6 cars only (1990-93). Terminal functions come from the 1990 workshop manual (VIN JM1NA351*L0100001 on); wire colours come from a later NA 1.6 Mazda wiring diagram bound into the same scan (it includes A/T, ABS and air bag systems, so it is 1991 or later, year not printed on the scanned pages). 1992-93 tables were not checked separately. The 1994-95 1.8 (BP, OBD-I) and 1996-97 1.8 (OBD-II) ECUs are different units and are not covered.
Model-year differences seen between the two Mazda documents: A/T cars add 2M (analogue throttle sensor), 2Z (4A/T control unit) and use 1V for the inhibitor switch; 2J is a ground input in the 1990 table but unused in the later diagram; 2H's California / Federal / Canada grounding rule is printed differently; and the airflow meter signal wire at 2O is G/Y in the 1990 manual but R in the later diagram. Identify wires by terminal, not colour alone.
There is no separate 5 V sensor supply other than 2K, which feeds the airflow meter (and the A/T throttle sensor); the M/T throttle sensor is a two-contact switch (idle at 1N, full load at 2L), not a potentiometer. The coolant, intake air and airflow sensors return to 2D.
Not covered: the ECU's internal connector part numbers and terminal part numbers (Mazda does not print them in these documents), and the 1994-97 1.8 ECUs. The 1990 manual measures voltages with the Mazda Engine Signal Monitor and adapter between ECU and harness rather than by back-probing.
Safety: disconnect the battery negative before unplugging or re-pinning the ECU connectors (on cars with the audio anti-theft system, have the code first). Do not force sharp probes into the connector face or the wire-entry side; use matching terminals or a breakout adapter. Mazda warns never to apply voltage to the Engine Signal Monitor terminals A and B.
Plug-and-play harness
A plug-in harness built for the Haltech Nexus S3 pinout is listed for this vehicle. The ECU2 follows that published pinout, so the factory ECU is unplugged and the ECU2 plugs into the car's own loom. Nothing is written to the factory ECU. Pin-compatible per the published S3 pinout, not yet fit-tested.
| Maker | Harness | Fits | Link | |
|---|---|---|---|---|
 | Nexus S2/S3 Plug n Play Adapter Harness Mazda MX5 NAHT-186336 | NA 1.6 (1990-93) and 1.8 (1994-97); manual | $535Lowest | Maker ↗ |
 | Manual 1990 - 1993 Mazda MiataBF29038-S3 | 1990-93 Miata 1.6 manual | $840 | Maker ↗ |
| Manual 1994 - 1995 Mazda MiataBF29039-S3 | 1994-95 Miata 1.8 manual | $840 | Maker ↗ |
| Manual 1996 - 1997 Mazda MiataBF29040-S3 | 1996-97 Miata 1.8 manual | $840 | Maker ↗ |
| Wire-in | Universal flying lead or re-terminated factory harness | Any engine (terminate to ECU2's two Superseal 34 connectors) | Universal harness from $405 | Maker ↗ |
Nexus S2/S3 Plug n Play Adapter Harness Mazda MX5 NA
- Plugs into
Mazda MX-5 NA ECU (B6 1.6 / BP 1.8) · B61P-18-881A, B61P-18-881B…
- OEM part numbers
- B61P-18-881A, B61P-18-881B, BPE8-18-881, BPL9-18-881
- ECU
- Mazda xxxx-18-881 engine control unit
- Confidence
- medium
Examples from used-parts listings.
Sources: E-1449
- Fits
- NA 1.6 (1990-93) and 1.8 (1994-97); manual
- Exclusions
- USDM OBD-II 1996-97; SE/Anniversary; automatic
- SKU
- HT-186336
- Maker fitment
- Mazda MX-5 NA 1.6/1.8; manual only; excludes USDM OBDII 96-97 and SE/Anniversary models
- Maker notes
- kit HT-213316; excludes USDM 96-97 OBDII
Boomslang plug-and-play harness for Haltech Nexus S3 - Manual 1990 - 1993 Mazda Miata
- Plugs into
Mazda Miata NA6 1.6 ECU · B61P-18-881, B61P-18-881A…
- OEM part numbers
- B61P-18-881, B61P-18-881A, B61P-18-881B
- ECU
- Mazda B6 (NA)
- Confidence
- low
Marketplace listings.
Sources: E-1469
- Fits
- 1990-93 Miata 1.6 manual
- Exclusions
- California-spec units may differ (B6AW seen)
- SKU
- BF29038-S3
- Maker fitment
- Mazda Miata (Manual); selector years 1990-1993; SKU label: Manual 1990 - 1993 Mazda Miata
- Maker notes
- separate SKUs exist for other Nexus models (-S2/-R3/-R5/-T1/-T2); 1990-93
Boomslang plug-and-play harness for Haltech Nexus S3 - Manual 1994 - 1995 Mazda Miata
- Plugs into
Mazda Miata NA8 1.8 ECU (OBD1)
- ECU
- Mazda BP (NA)
- Confidence
- low
Family from maker fitment only.
- Fits
- 1994-95 Miata 1.8 manual
- SKU
- BF29039-S3
- Maker fitment
- Mazda Miata (Manual); selector years 1994-1995; SKU label: Manual 1994 - 1995 Mazda Miata
- Maker notes
- separate SKUs exist for other Nexus models (-S2/-R3/-R5/-T1/-T2); 1994-95
Boomslang plug-and-play harness for Haltech Nexus S3 - Manual 1996 - 1997 Mazda Miata
- Plugs into
Mazda Miata NA8 1.8 ECU (OBD2)
- ECU
- Mazda BP (NA)
- Confidence
- low
- Fits
- 1996-97 Miata 1.8 manual
- SKU
- BF29040-S3
- Maker fitment
- Mazda Miata (Manual); selector years 1996-1997; SKU label: Manual 1996 - 1997 Mazda Miata
- Maker notes
- separate SKUs exist for other Nexus models (-S2/-R3/-R5/-T1/-T2); 1996-97 OBDII
Haltech and Boomslang are trademarks of their respective owners. GAINS is not affiliated with or endorsed by them.
Your GAINS system for this car · pre-release
ECU2 for the MX-5 Miata NA
Planned with the same rules as the configurator for this car's 4 cyl · port injection · cable throttle. The factory ECU is unplugged and replaced; nothing is written to it.
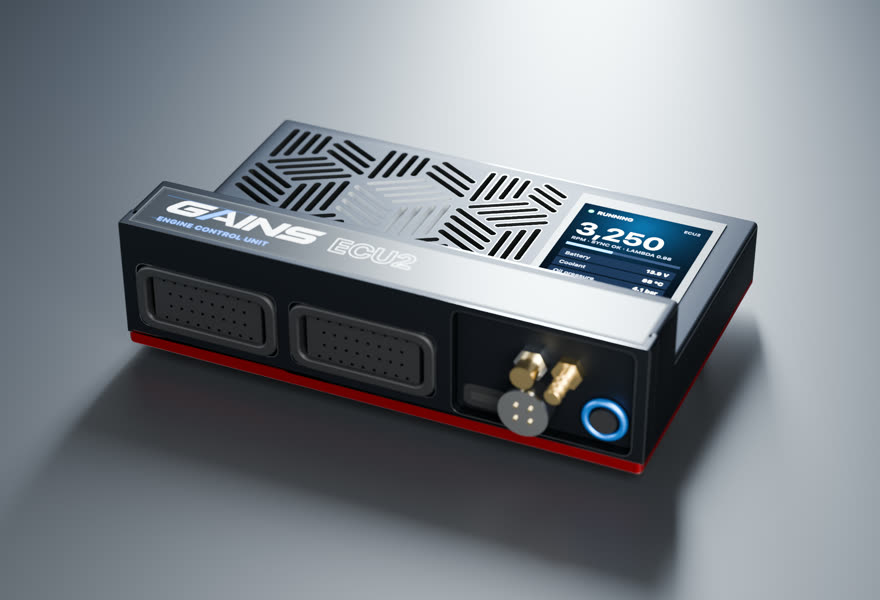
- Price TBA
ECU2Engine controller
4 cyl · port injection · cable throttle
Full sequential fuel and spark for this 4-cylinder on a cable throttle, with the wideband built in.
in designEst. availability: April 2027
Add PDM2 to switch and protect chassis loads (pumps, fans, lights, accessories). Add it in the configurator →
Track days? Add the Telemetry Dongle Pro for 25 Hz GPS lap timing; it plugs into the OBD-II port, and your phone is the dash. Plan it in the configurator →
What you get
- A screen on the ECUA 2.4-inch, 500-nit display in the lid, readable in a footwell.
- Faults in plain words"Coolant temp sensor open circuit.
- S3-style harnessesConnector A and C pin functions follow the published Nexus S3 wiring diagram.
- Powered CAN portA sealed 4-pin port on the insert carries 12 V and CAN for the PDM2 and GAINS displays: one cable per accessory.
- GAINS insideThe on-ECU adaptive layer, the app, logging and your limits.
How it wires in
- Haltech S3 plug-in harness1 listed · from $535 USD listHT-186336
- Factory-connector → S3 adapter3 listed · from $840 USD list
- Wire-inAlways possible
Pin-compatible per the published S3 pinout, not yet fit-tested. Every harness option for this car ↓
ECU2 is in design; specifications may change. All GAINS hardware is pre-release concept design; nothing is for sale yet and no application is validated on a vehicle. Harness fitment is from published pinouts and not yet fit-tested.
Swap guides
Into the MX-5 Miata NA
How GAINS approaches the MX-5 Miata NA
Our starting method for this engine, as foundations first: get it running and drivable, then learn fuel, then the hardware-specific strategies. It is a methodology outline, not a validated calibration.
- 1Base map and first startplanned
Start from displacement, injector data and the sensors fitted, then let the first-start learner settle cranking, idle and warm-up before any load work. The goal is a safe, running engine, not a finished calibration.
- 2Lambda targets and VE learningclosed loop on GAINS ECUs
Air-fuel targets come from your goal (street, track, economy). The ECU then learns its fuel table cell by cell from the onboard wideband inside a signed envelope, and you approve promoting what it learned into the base map.
- 3Cam phasing (VVT)gated
Begin with conservative overlap. Cam targets per load cell are then chosen with torque and knock in mind, keeping idle and cold overlap low for stability. Widening cam authority follows the same evidence-gated path as spark.
- 4Drivability foundationsplanned
Pedal map, tip-in and decel fuel, idle control, cold start and warm-up enrichment: the tables tuners spend hours on after the main map. Each is a strategy in the knowledge engine with its own limits.
- 5Factory load sensingfactory reference
What the factory ECU measures load with: varies by year/market (low confidence); NA 1.6 B6: vane-type air flow meter (Wikipedia). NA 1.8 (1994-97): conflicting (forum says hot-wire came with 1.8; parts listings label NA 1.8 unit 'MAF AFM'). NB (1999+): MAF per parts listing. O2 type inferred from era, not sourced.
- 6Wideband sensorhardware
Add a wideband: the factory narrowband only tells rich from lean around stoichiometric, so it cannot close the loop at power or economy targets; fit a Bosch LSU 4.9 for the GAINS ECU's built-in controller
- 7Bottom end and head sealingfactory reference
Reported: Rods/pistons commonly cited as first limit under boost; cooling under sustained track use also cited (forum, BOFI blog). (low confidence) Limits depend on tune quality, fuel, rpm and condition and are not guaranteed.
GAINS on the MX-5 Miata NA
ECU2
Designed so your phone is the laptop, keypad and dash
The GAINS app is designed to handle tuning, logging, gauges and switch inputs over Bluetooth, so the system needs no separate CAN keypad or display. Keypad, dash and logging views are planned; the iOS prototype runs on simulated data today.
Wideband, IMU and logging built in
An onboard Bosch LSU 4.9 wideband controller, a 6-axis IMU and onboard logging are designed into the ECU rather than sold as add-on modules.
Modular, so you buy what the engine needs
This engine runs on ECU2. PDM2 (power, body and gearbox) is optional and connects over ECU2's powered CAN port; the Telemetry Dongle Pro adds GPS lap timing from the OBD-II port.
Calibration that keeps learning
Instead of a fixed map that drifts as parts and conditions change, the ECU keeps adapting its fuel trims within limits you can see and approve in the app.
Adaptive tuning strategies
- VE learning closed loop on GAINS ECUs
Learns the fuel table from the onboard wideband as you drive, cell by cell, inside a signed authority envelope. Learned trims are promoted into the base map without a step in fuelling.
- Goal-based lambda targets closed loop on GAINS ECUs
Sets air-fuel targets from your goal (economy, response, power, safety margin) instead of a single fixed table.
- Knock protection protection
Listens for knock on a dedicated knock processor, pulls timing at once and restores it slowly. It only ever reduces advance.
- Warm-up, cranking, idle and transient fuel planned
The same learning approach applied to the tables tuners spend hours on after the main map is done.
- Spark advance and boost authority gated
Widening ignition advance or boost is never automatic. It stays an expert or dyno decision until validated knock detection exists for the engine family.
Already running another ECU? In advisor mode the same strategies read your logs and recommend exact table changes with the reasoning, which you apply in your ECU vendor's own software.
GAINS hardware is pre-release concept design. Simulated results only; nothing is validated on a vehicle yet.
Catalog data and evidence
- Catalog data, not yet expert-reviewed.
- No vehicle photos: illustrations only until licensed imagery is available.
- E-916 Haltech S3 adapter harness page (sourced, high confidence)
- E-934 Boomslang identity (sourced, high confidence)
- E-935 Boomslang S3 catalog size (sourced, high confidence)
- E-900 Haltech Nexus S3 catalog (sourced, high confidence)
- E-941 S3 engine harness availability (inferred, medium confidence)
- E-1449 MX-5 NA/NB ECU (reported, low confidence)
- E-1469 Miata NA6 ECU (unverified-secondary, low confidence)